Saturday, April 28, 2012

Back in black

So the Lucy dress was the beginning of me making a bunch of stuff in black.  I've made 3 tops and a pair of leggings.  All black.

I made the Pleated Pia top from Style Arc.  I made this top as a wearable muslin.  I was thinking of using this pattern for another fabric, but after making it,  I'm still searching for the right pattern for my Hilco Fluturi fabric.  Pia definitely fits me better than Lucy.

SA Pleated Pia in black

I also made an Ottobre 303 top in black merino rib knit.  Love this top.  Looks great with some of my lovely brooches.  I would have worn one in the photo, but the photographer was impatient, and I feel lucky to even have these photos.   I was feeling a bit frustrated with the photographer when this photo was taken.

Otto 303 merino rib knit

Then I made another Mareena top in black.  This time I used some embroideries from the Florafox set. 

Florafox Mareena top

I've changed the overlocker threads back to white, so that's all for black now.

Monday, April 23, 2012

Will's cake n stuff

I made two cakes for Will's party because I was expecting 20+ people.  I was worried that one cake wouldn't be enough.  In usual Sara-fashion I decided to make a cake that I hadn't made before.  I do this often.  I go against the advice of not making something for the first time for a dinner party or party.  I always see it as an opportunity to try something new.  Now I did choose a recipe from a reputable author.   I made the Deeply Dark Devil's Food Cake from The Cake Book by Tish Boyle. Tish is the creator of my favourite chocolate chip cookie recipe.

I split the cakes and filled them with sliced strawberries and whipped cream.  I then put a milk chocolate glaze on top and decorated with strawberries.

choc strawberry cake

Here it is on my new cake plate and dome.  The cake dome was a total score at Target for $36 on sale.  It's made by Libbey which is an American brand of everyday glassware.

cake stand

We really, really enjoyed this cake.  A lot of the time I can be a bit "meh" about cake, but this was moist and delicious.  The berries and cream filling was perfect.

The cake recipe

The full recipe makes a relatively tall one-layer cake that can be sliced horizontally into two or three layers, while the half recipe makes a cake which can be used whole or sliced into two layers.

>makes one 9-inch cake (23cm)

212g (1 3/4 cups) all purpose flour
2 tsp baking powder
3/4 tsp baking soda
3/4 tsp salt
156g (11 tbsp) unsalted butter, softened
300g (1 1/2 cups) granulated sugar
61g (2/3 cup) Dutch-processed cocoa powder
2 large eggs
1 tsp vanilla extract
320ml (1 1/3 cups) warm water

1.  Position a rack in the center of the oven and preheat the oven to 165C/325F.  Grease the bottom and sides of a 9x3-inc springform pan.  Dust the pan with flour (I just used a normal cake tin which I lined bottom and sides with baking paper)

2.  Sift together the flour, baking powder, baking soda and salt into a medium bowl.  Whisk until well blended, and set aside.

3.  In the bowl of an electric mixer, using the paddle attachment, beat the butter at medium speed until creamy, about 1 minute.  Gradually add the sugar and beat at high speed until the mixture is pale and well blended, about 3 minutes.  Add the cocoa powder and beat at medium speed for 1 minute, scraping down the sides of the bowl with a rubber spatula as necessary.  Beat in the eggs one at a time, beating well after each addition.  Beat in vanilla extract.  At low speed, add the flour mixture in three additions, alternating it with the warm water in two additions.  Scrape down the sides of the bowl and mix at low speed for 30 seconds.  Pour the batter into the prepared pan and smooth the top.

4.  Bake the cake for 45-55 minutes for the full recipe, 25-30 minutes for the half recipe, until a cake tester inserted into the center of the cake comes out clean.  Cool the cake in the pan on a wire rack for 20 minutes.

5.  Remove the side of the pan and invert the cake onto the rack.  Remove the bottom of the pan and let the cake cool completely. 

Store:  at room temperature, wrapped in foil, for up to 5 days.

Now for something completely different....
A baby blanket for a friend's recent arrival.  Normally I would hand embroider the name, but I can't find my embroidery threads! 

baby blanket michael
Blue and turquoise low water immersion dyed silk and flannel blanket.  His older brother has one that is violet and turquoise, so I decided to go with blue/turquoise for baby Michael.

Now if I can manage to take photos of the three tops that I made myself last week, I can share those!

Saturday, April 14, 2012

I love to bake, but...

it hasn't been helpful on the weight loss front.  I was going to get back on the wagon after Will's birthday party on Wednesday.  I'm slowly getting there.  I have another party tonight.

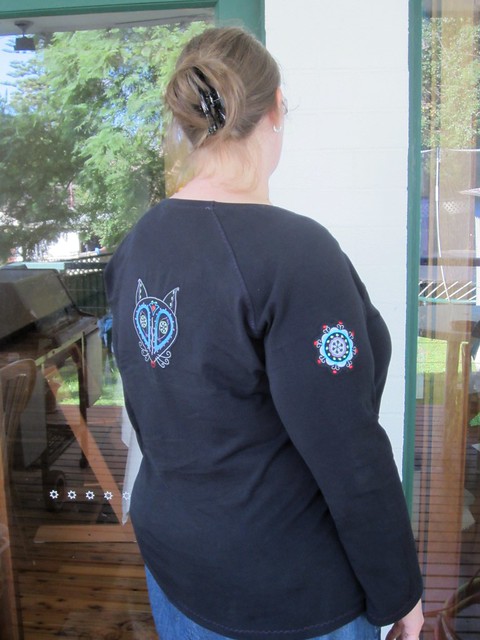
I thought I'd make a dress to wear to the party.  I just ordered a few patterns from Style Arc.  One of the patterns is the Lucy Dress.  I ordered size 22 as I am closer to 22 than 24 which should be about right as I know a US22 is my RTW size now.    I was lazy.  I didn't measure the pattern and myself to check the fit.   So I ended up with a dress that was just a tiny bit too snug around the hips and bum. 


SA Lucy Dress back
Now it looks like have huge rolls of back fat. I don't.  I'm not saying that I don't have padding because I do, just not the way it looks in that photo.  I do have to say that when I stand in the mirror, it doesn't look that bad, so I'm not sure what I was doing in that photo.   What happens all of the time is the excess fabric around the lower back.  I think it's because the dress is clinging to my bum instead of hanging freely. 

From the front

SA Lucy Dress front
I know I said it's all my fault that the dress doesn't fit as well as I'd like, but I am wondering if the shoulders are a bit wide for me. The sleeves seem to be far out on my arm.  One day I need to get out my book on fitting patterns.  I'm so lazy.  I just want to cut something out and have it fit with no work on my part.  (yeah, yeah dream on!)

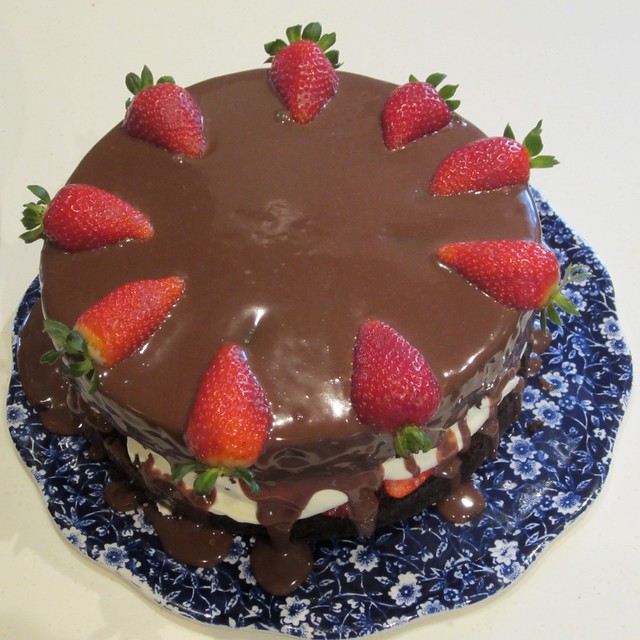
So here is one of the reasons for my slowed, i.e. non-existent, weight loss.

Chocolate Lime Tart.

I was going to make a simple lime tart from Donna Hay's Flavours cookbook for dessert on Easter Sunday.  I've made this  tart before and it's lovely.  Well, on Sunday when I pulled my blind baked pastry out of the oven, it cracked along the crease about 1/4 way around.  I stared at it with dismay.  I couldn't pour a liquid filling into it to bake, it would just leak out.  So Col and I had a quick brainstorm, and I decided to use white chocolate as Spakfilla.

white choc spakfilla

So while the white chocolate solved the problems with the crack, but then I wasn't sure if I could bake the filling.  So my trusty Thermomix came to the rescue.  I cooked the filling in it and then put it into the tart.  After the tart had chilled. I made dark chocolate shards to put on the tart.

choc lime tart

The flavour combination was inspired by my favourite chocolate from Belle Fleur, Lime & Cointreau.   The chocolate has a dark chocolate ganache base upon which sits a lime/Cointreau cream.  It's then enrobed in white chocolate.   My final tart had a few issues.  The filling didn't set as quickly as I'd like.  It was firmer the next day, so I think that I either needed to cook it a couple more minutes or just let it sit overnight in the fridge.  Also the layer of white chocolate on the bottom was too thick.  In my haste, I dumped white chocolate callets into the pastry and melted them in the oven and spread them.  It would have been better to melt the chocolate and then paint the pastry and fill the crack with the melted chocolate.

If I were to do it again, I would melt dark chocolate and brush a thin layer onto the pastry.  Then I would fill it with lime filling and put white chocolate shards/curls on the top of the tart.  And there will be another time because the flavours worked.

Here's the recipe for just the Lime Tart
from Flavours by Donna Hay

1 quantity sweet shortcrust pastry


2 cups plain flour
3 tablespoons caster sugar
155g butter, chopped
iced water

Basically I bung it all in my Thermomix, minus the water.  Wizz it up until there are small butter pieces.  Then I add enough iced water to get it to bind.    You can do the same in a food processor obviously. Shape it into a disc, wrap it up and refrigerate for 30 minutes before rolling.

Lime Filling
1 cup caster sugar
4 eggs
1 cup cream  (cream with 35% fat content, I used pure cream, but I'm sure thickened would be fine)
1 cup lime juice 

Preheat the oven to 180-degC.  Roll out the pastry to fit a 25cm removable-base tart tin.  Prick a few holes in the pastry and line with non-stick baking paper.  Fill with rice of baking weights and bake for 10 minutes.  Remove the baking weights and paper and bake for a further 10 minutes.  This process is called blind baking and will keep the tart shell crisp when filled with a wet filling.  To make the lime filling, place the sugar, eggs, cream and lime juice in a bowl and mix to combine.  Skim the top of the mixture to remove any bubbles or foam.  (I have to mention that I like to use my kitchen torch to pop the bubbles.  I saw them do it on Masterchef, and it works really well.  More fun and easier than skimming in my opinion!).   Pour into the tart shell and reduce the oven to 160-deg C and bake for 20-25 minutes or until the filling is just et.  Refrigerate the tart until firm.

To serve, cut into wedges and serve with thick cream or ice cream.

note - You can swap the lime juice for lemon or blood orange juice.

Next up I'll share Will's birthday cake

Monday, April 9, 2012

Festival of Bunnies and Chocolate

We've been busy bunnies over the past few days.

On Friday we made hot cross buns, but we didn't use the traditional cross and went for our own designs.  Mollie did hearts and smilies and "I love you" (which was really hard to read...it's the one that looks H is it). 

non HC buns

I made flying spaghetti monsters

FSM bun

On Saturday Mollie had a birthday party in the morning then Will and Moo went to a chocolate workshop for kids at the Shangri-La Hotel.  We joined up with Cass and her girls.

making the eggsdecorating the eggs

After the workshop we met up with some friends who were staying in the city for the weekend.  We had dinner together and went to the fireworks at Darling Harbour.

friends at fireworksfireworks

Every Easter I set up a little display for the kids.  I was debating about doing it this year, but Moo asked, so here it is.

Chocolate bunny scene

I hope you've had a lovely Easter weekend.

Saturday, April 7, 2012

Red wins

Red had the most votes although I have to admit that I also had a leaning towards to white with square detail and the swirly blue.   Today I actually sat down and sewed that red button onto the bag.  I felt it was necessary since I was venturing into the city this afternoon and didn't want to risk spilling the contents of my bag all over the street.  It could happen.  I'm totally unco!


bag w red button

Plus red goes with the new shoes.

Red Naot Sea top
Yup, I have a big foot.

And I love the detail on the side

Red Naot Sea side 2

Sunday, April 1, 2012

Help me choose!

My beloved bag needs a new button.  Tas used a lovely vintage button, but from lots of wear, it broke.  I use this bag every day.

beloved bag

Thankfully I won Helen's button giveaway a few months back.  A good look through those buttons gave me these options...
BROWN

brown button

RED

reddish button

WHITE

irridescent white

swirly BLUE

shimmery blue

BLUE

blue button

OFF WHITE w/ square detail

off white square detail button

shimmery LIGHT PINK

shimmery light pink button

mottled BROWN

mottled brown button

What would you choose?