
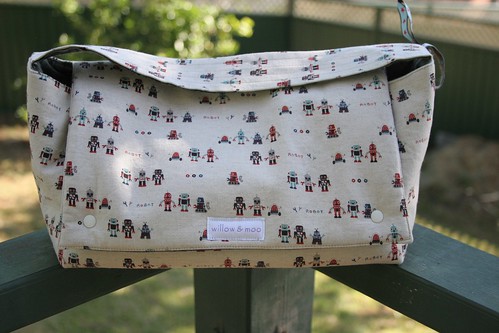
This lunch bag is designed to fit the Tupperware Sandwich Plus lunch box.

I have drawn the pattern pieces in half scale. This was so I could scan them. You might be able to enlarge them on a copier at 200%. Otherwise you can see the dimensions and shapes, so you can draw them with a ruler. The pieces do NOT include a seam allowance!!!! (this is because I didn't want to confuse you as I measured the lunch box in inches and my seam allowance is 1 cm). Please don't ask me why I did this! My brain works in strange ways and I am used to flipping around between imperial and metric measurements.
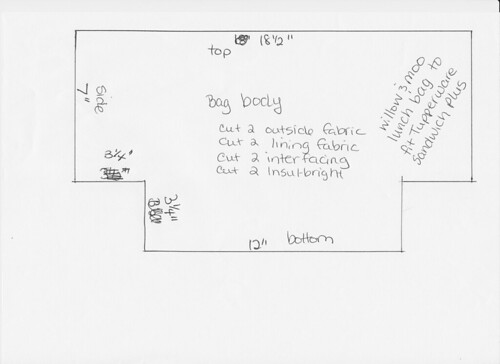
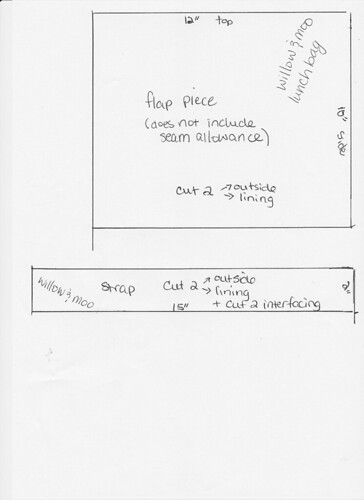
There are 3 pieces: the bag body, the flap and the strap.
When you cut out the pieces, you need to add a seam allowance! Pick whatever you like. I used 1cm.
I have to be honest and say I don't know how much fabric that you will need. I'd guesstimate and say about 0.5m of each fabric. You also need snaps or velcro (if you are going to use velcro read my comments at the end of the instructions because I'd choose to sew on the velcro while constructing the bag, not when it's finished. Although you could do it when it's finished. The stitching will just show on the outside of the flap.
You need to cut
For the body
2 x fabric for the outside
2 x fabric for the lining
4x pellon H630 (this is to give structure and a bit extra insulation)
2 x insul-bright
For the flap
1 x outside fabric
1 x lining fabric
2 x pellon H630
1 x insul-bright
For the straps
1 x outside fabric
2 x lining fabric (or can be the same as outside fabric)
2 x interfacing (I used a medium weight woven interfacing and cut it without the seam allowance)
I also inserted a base into my bag. I used Nicole M's tutorial on how to make a bag base with Fast-2-Fuse. If you have some Fast-2-Fuse sitting around, I would recommend making a base as it gives the bag nice stability since the bottom of it is quite large. But if you don't want to bother, I think it will be fine as the lunch box will stablise the bag when it is in there.
So now that you've cut that big stack of pieces. Iron all the pellon onto the pieces, so each body piece and each flap piece.
Iron interfacing onto the straps
As I sew, I press all seams open. I also used a heavy weight needle 100/16. You definitely need a sharp needle for sewing through multiple layers of fabric like a denim needle.
Lets start with the strap
1. With the strap pieces wrong side together sew down one long side. Turn right side out and press the seam. Also press under the seam allowance on the strap pieces. Topstitch the long edges of the strap. I also stitched rows of stitching down the length of the strap to stablise it (in addition to the topstitching there are 3 rows sewn down the strap about 0.5" apart)
Set aside the strap.
Now lets sew the flap
1. Put the flap pieces right sides together. Place the Insul-bright on top of the outside fabric. I used some pins, so everything doesn't shift. I also used a walking foot to sew the layers together. Sew down one side around the bottom and up the side. Leave the top of the flap open.
2. Trim the seam allowance and clip the corners. Turn the flap right side out and press. Topstitch around the sides and bottom. Then baste the top of the flap closed within the seam allowance.
Set aside the flap.
Now for the body
Lining
1. With wrong sides togehter, sew the side seams and the bottom seam of the lining. Trim seams and clip corners. Press the seams open.
2. Now match up the side seam with the bottom seam, and sew across this diagonal. This creates the boxed shape on the bottom. Repeat on the other side.
Body
1. Sew the Insul-bright to the wrong side of the body pieces just within the seam allowance. You want the stitching close to where you are going to sew the seam, but not on the line or too far into the seam allowance. Stitching it down keeps the Insul-bright from shifting when you sew the pieces together. I like to be able to trim the Insul-bright back as close to the seam as possible which is why you don't want to baste it down near the edge.
2. Sew the outside body pieces together like the lining pieces, so side seams then bottom seam. Trim the Insul-bright close to the seam. Press. For my bag I topstitched the sides and bottom seam before i sewed the bottom edge seams. For my bag I stitched 6mm each side of the seam using my 1/4" foot. Then I sewed the bottom edge seams. together.
3. If you are going to do a bag base then you need to sort it out now. I did mine according to Nicole M's tute and attached it to the lining.
4. Mark the centre back of the back of the outside of the bag and the centre of the flap. Place the flap and outside bag with outer fabrics facing, matching up the centre marks. Pin and stitch the flap to the back of the bag within the seam allowance
5. Mark the centre points of the short strap edges. Match those points to the side seams and pin the strap with the outer fabric facing the outer fabric of the bag. Stitch the down on each side within the seam allowance. This will scrunch the bag up a little bit because the strap isn't super long.
6. Now turn the lining so that its right side is facing the right side of the outside of the bag. Match side seams and pin. Stitch the lining to the outside of the bag leaving an opening of about 15cm along the front of the bag. Trim the excess fabric in the seam allowance (but not near the opening. I find if I trim too much there it can be hard to press under the fabric Leave an opening along the front of the bag.
7. Pull the bag through the opening. Press the seam and press the edges of the opening. Pin closed the opening (or use some Wash Away Wonder Tape). Topstitch the top edge of the bag all the way around.
8. The bag is basically completed except for a closure. I used snaps because my snap press is one of my new toys. On the top flap, I placed snaps on each side (1" up from the bottom and 1" in from the side). The snaps on the body of the bag are approximately 1" in from the side "edge" and 1.5" up from the bottom edge (there is no seam there, but you can see the "edge" based on where the corner of the bag is. Same for the bottom "edge").
Here you can see the snaps
Velcro would make an excellent closure. I just wanted to use my snap press. If using Velcro I'd consider sewing the pieces of velcro on before construction. So sew the hook piece to the lining of the flap before construction and sewing the loop piece to the body of the bag before sewing it all together. That way the stitching from sewing the velcro will be hidden on the inside of the bag. I can't give you exact placement for the velcro, but you could figure it out based on the positioning of the snaps. I have to be honest and say that I decided where to place the snaps after I'd sewn the bag and picked the spot where the flap fell and I thought it looked good.
Have fun! If you've noticed an error, please let me know. I just knocked this up for Will, and never really had any intention of doing anything further. Feel free to make as many as you want. Make them to sell, just don't take credit for the design because that's totally not cool.
4 comments:
Thank you so much for taking the time to post these details. I will be making one as soon as I can. Our lunchbox fits in the backpack but side on so the sandwiches fall apart. I am really grateful.
Sara thanks for the tutorial and can I say I am thrilled that you measured in inches but added the s/a in cm because that is what I do so many times it drives my mum nuts!
Clo, I think I know why I ended up measuring in inches. My cutting mat's grid lines are in inches and initially I placed the lunchbox on it. So I started with inches and just left it there.
Susie, you're welcome! :)
Thank you very much for your nice tutorial!
Post a Comment